Use PorterLB in BGP Mode
This document demonstrates how to use PorterLB in BGP mode to expose a Service backed by two Pods. The BgpConf, BgpPeer, Eip, Deployment and Service described in this document are examples only and you need to customize the commands and YAML configurations based on your requirements.
Instead of using a real router, this document uses a Linux server with BIRD to simulate a router so that users without a real router can also use PorterLB in BGP mode for tests.
Prerequisites
- You need to prepare a Kubernetes cluster where PorterLB has been installed.
- You need to prepare a Linux server that communicates with the Kubernetes cluster properly. BIRD will be installed on the server to simulate a BGP router.
- If you use a real router instead of BIRD, the router must support BGP and Equal-Cost Multi-Path (ECMP) routing. In addition, the router must also support receiving multiple equivalent routes from the same neighbor.
This document uses the following devices as an example:
| Device Name | IP Address | Description |
|---|---|---|
| master1 | 192.168.0.2 | Kubernetes cluster master, where PorterLB is installed. |
| worker-p001 | 192.168.0.3 | Kubernetes cluster worker 1 |
| worker-p002 | 192.168.0.4 | Kubernetes cluster worker 2 |
| i-f3fozos0 | 192.168.0.5 | BIRD machine, where BIRD will be installed to simulate a BGP router. |
Step 1: Install and Configure BIRD
If you use a real router, you can skip this step and perform configuration on the router instead.
-
Log in to the BIRD machine and run the following commands to install BIRD:
sudo add-apt-repository ppa:cz.nic-labs/bird
sudo apt-get update
sudo apt-get install bird
sudo systemctl enable bird
NOTE
- BIRD 1.5 does not support ECMP. To use all features of PorterLB, you are advised to install BIRD 1.6 or later.
- The preceding commands apply only to Debian-based OSs such as Debian and Ubuntu. On Red Hat-based OSs such as RHEL and CentOS, use yum instead.
- You can also install BIRD according to the official BIRD documentation.
-
Run the following command to edit the BIRD configuration file:
vi /etc/bird/bird.conf -
Configure the BIRD configuration file as follows:
router id 192.168.0.5;

protocol kernel {
    scan time 60;
    import none;
    export all;
    merge paths on;
}

protocol bgp neighbor1 {
    local as 50001;
    neighbor 192.168.0.2 port 17900 as 50000;
    source address 192.168.0.5;
    import all;
    export all;
    enable route refresh off;
    add paths on;
}
NOTE
-
For test usage, you only need to customize the following fields in the preceding configuration:
router id: Router ID of the BIRD machine, which is usually set to the IP address of the BIRD machine.protocol bgp neighbor1:local as: ASN of the BIRD machine, which must be different from the ASN of the Kubernetes cluster.neighbor: Master node IP address, BGP port number, and ASN of the Kubernetes cluster. Use port17900instead of the default BGP port179to avoid conflicts with other BGP components in the system.source address: IP address of the BIRD machine.
-
If multiple nodes in the Kubernetes are used as BGP neighbors, you need to configure multiple BGP neighbors in the BIRD configuration file.
-
For details about the BIRD configuration file, see the official BIRD documentation.
-
-
Run the following command to restart BIRD:
sudo systemctl restart bird -
Run the following command to check whether the status of BIRD is active:
sudo systemctl status bird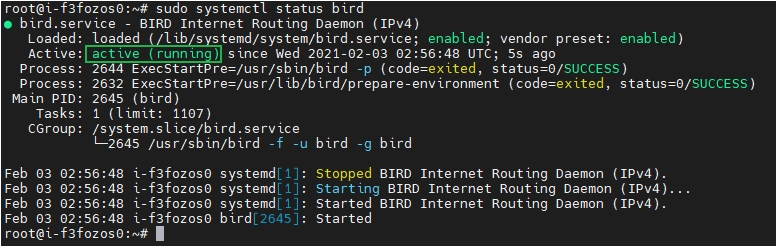
NOTE
If the status of BIRD is not active, you can run the following command to check the error logs:
journalctl -f -u bird
Step 2: Create a BgpConf Object
The BgpConf object is used to configure the local (Kubernetes cluster) BGP properties on PorterLB.
-
Run the following command to create a YAML file for the BgpConf object:
vi porter-bgp-conf.yaml -
Add the following information to the YAML file:
apiVersion: network.kubesphere.io/v1alpha2
kind: BgpConf
metadata:
  name: default
spec:
  as: 50000
  listenPort: 17900
  routerId: 192.168.0.2
NOTE
For details about the fields in the BgpConf YAML configuration, see Configure Local BGP Properties Using BgpConf. -
Run the following command to create the BgpConf object:
kubectl apply -f porter-bgp-conf.yaml
Step 3: Create a BgpPeer Object
The BgpPeer object is used to configure the peer (BIRD machine) BGP properties on PorterLB.
-
Run the following command to create a YAML file for the BgpPeer object:
vi porter-bgp-peer.yaml -
Add the following information to the YAML file:
apiVersion: network.kubesphere.io/v1alpha2
kind: BgpPeer
metadata:
  name: porter-bgp-peer
spec:
  conf:
    peerAs: 50001
    neighborAddress: 192.168.0.5
NOTE
For details about the fields in the BgpPeer YAML configuration, see Configure Peer BGP Properties Using BgpPeer. -
Run the following command to create the BgpPeer object:
kubectl apply -f porter-bgp-peer.yaml
Step 4: Create an Eip Object
The Eip object functions as an IP address pool for PorterLB.
-
Run the following command to create a YAML file for the Eip object:
vi porter-bgp-eip.yaml -
Add the following information to the YAML file:
apiVersion: network.kubesphere.io/v1alpha2
kind: Eip
metadata:
  name: porter-bgp-eip
spec:
  address: 172.22.0.2-172.22.0.10
NOTE
For details about the fields in the Eip YAML configuration, see Configure IP Address Pools Using Eip. -
Run the following command to create the Eip object:
kubectl apply -f porter-bgp-eip.yaml
Step 5: Create a Deployment
The following creates a Deployment of two Pods using the luksa/kubia image. Each Pod returns its own Pod name to external requests.
-
Run the following command to create a YAML file for the Deployment:
vi porter-bgp.yaml -
Add the following information to the YAML file:
apiVersion: apps/v1 kind: Deployment metadata: name: porter-bgp spec: replicas: 2 selector: matchLabels: app: porter-bgp template: metadata: labels: app: porter-bgp spec: containers: - image: luksa/kubia name: kubia ports: - containerPort: 8080 -
Run the following command to create the Deployment:
kubectl apply -f porter-bgp.yaml
Step 6: Create a Service
-
Run the following command to create a YAML file for the Service:
vi porter-bgp-svc.yaml -
Add the following information to the YAML file:
kind: Service
apiVersion: v1
metadata:
  name: porter-bgp-svc
  annotations:
    lb.kubesphere.io/v1alpha1: porter
    protocol.porter.kubesphere.io/v1alpha1: bgp
    eip.porter.kubesphere.io/v1alpha2: porter-bgp-eip
spec:
  selector:
    app: porter-bgp
  type: LoadBalancer
  ports:
    - name: http
      port: 80
      targetPort: 8080
  externalTrafficPolicy: Cluster
NOTE
- You must set
spec:typetoLoadBalancer. - The
lb.kubesphere.io/v1alpha1: porterannotation specifies that the Service uses PorterLB. - The
protocol.porter.kubesphere.io/v1alpha1: bgpannotation specifies that PorterLB is used in BGP mode. - The
eip.porter.kubesphere.io/v1alpha2: porter-bgp-eipannotation specifies the Eip object used by PorterLB. If this annotation is not configured, PorterLB automatically uses the first available Eip object that matches the protocol. You can also delete this annotation and add thespec:loadBalancerIPfield (for example,spec:loadBalancerIP: 172.22.0.2) to assign a specific IP address to the Service. - In the BGP mode, you can set
spec:loadBalancerIPof multiple Services to the same value for IP address sharing (the Services are distinguished by different Service ports). In this case, you must setspec:ports:portto different values andspec:externalTrafficPolicytoClusterfor the Services. - If
spec:externalTrafficPolicyis set toCluster(default value), PorterLB uses all Kubernetes cluster nodes as the next hops destined for the Service. - If
spec:externalTrafficPolicyis set toLocal, PorterLB uses only Kubernetes cluster nodes that contain Pods as the next hops destined for the Service.
- You must set
-
Run the following command to create the Service:
kubectl apply -f porter-bgp-svc.yaml
Step 7: Verify PorterLB in BGP Mode
The following verifies whether PorterLB functions properly.
-
In the Kubernetes cluster, run the following command to obtain the external IP address of the Service:
kubectl get svc
-
In the Kubernetes cluster, run the following command to obtain the IP addresses of the cluster nodes:

-
On the BIRD machine, run the following command to check the routing table. If equivalent routes using the Kubernetes cluster nodes as next hops destined for the Service are displayed, PorterLB functions properly.
ip routeIf
spec:externalTrafficPolicyin the Service YAML configuration is set toCluster, all Kubernetes cluster nodes are used as the next hops.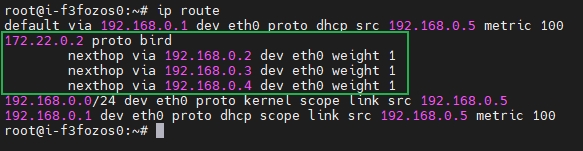
If
spec:externalTrafficPolicyin the Service YAML configuration is set toLocal, only Kubernetes cluster nodes that contain Pods are used as the next hops.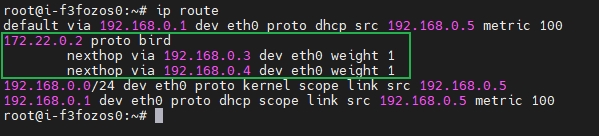
-
On the BIRD machine, run the following command to access the Service:
curl 172.22.0.2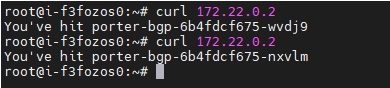
Feedback
Was this page helpful?
Glad to hear it! Please tell us how we can improve.
Sorry to hear that. Please tell us how we can improve.